
Making an Industrial Pipe Media Console
When we finished our basement we had installed a projector to watch movies/tv rather than a regular television. Up until now, we’ve had the receiver and a few other devices sitting on an IKEA coffee table just beneath the screen. So that brings us to today, I’ve been wanting to make a new media console that not only went with the other furniture in our basement, but also one that will hold all of our devices and is proportional to our screen.
Materials
2x8x8’ (x9)
10’ 3/4” black iron pipe (x2)
Various pipe fittings
3/8” round rod (optional)
Titebond 3 wood glue
5 minute Epoxy
Totalboat epoxy
3” decking screws (optional)
Paint / Primer (optional)
Stain / Poly (optional)
Tools
Jointer
Planer
Miter Saw
Angle Grinder
Track Saw / Circular Saw
Router
Drill / Driver
Random Orbit Sander
Pipe Clamps
Right Angle Guides
Start milling the lumber
This console is made entirely of standard 2x8s that you can pickup from your local big box store. To start off, I cut all my pieces to rough length over at the miter saw. Rather than cutting all at once, I took a shallow first pass and then follow up with the through cut. This helps prevent chip out along the face of the board and leaves a smooth edge.

With all my pieces cut, I then moved over to the jointer to flatten one face. It’s important to feed the boards through with just enough pressure to keep it moving forward, if too much is applied you risk adding a potential bow to the board. Once I get the board established on the outfeed table, I maintain pressure on that end while walking along the board with my push blocks.

After flattening one face on each board, I moved to the planer to make the opposite face parallel.

Thus far I only removed enough material on both faces to expose new fibers. I wanted to give the boards time to release any internal stresses after milling, so I stickered the boards and let them sit for a few more days. After that, I came back and milled everything to the final dimension.

Prep for assembly
Off camera I had milled the boards to their final dimension and glued up all the panels for the console. I then came back with a chisel, along with a hand plane, to remove any glue squeeze out and to smooth the joints between each board.

I had originally planned to have the console assembled with reinforced miters, so I set my tracksaw to 45 degrees and trimmed the panels to their final length.

With all the panels cut to final length, I marked and laid out the stopped dados for the shelf that ultimately ran the full length of the console. To make sure the dado was the right size, I used a scrap piece of material that was the same thickness as the shelf.

Using a speed square, I marked where I want the dado to stop while referencing the front edge of the panel.
To remove the material, I pulled out my plunge router and free handed the dado in multiple passes. Since I didn’t use a guide, I made sure not to get too close to my lines.

I squared up the end of the dado using a chisel and then sanded to my lines using a piece of scrap as a guide.

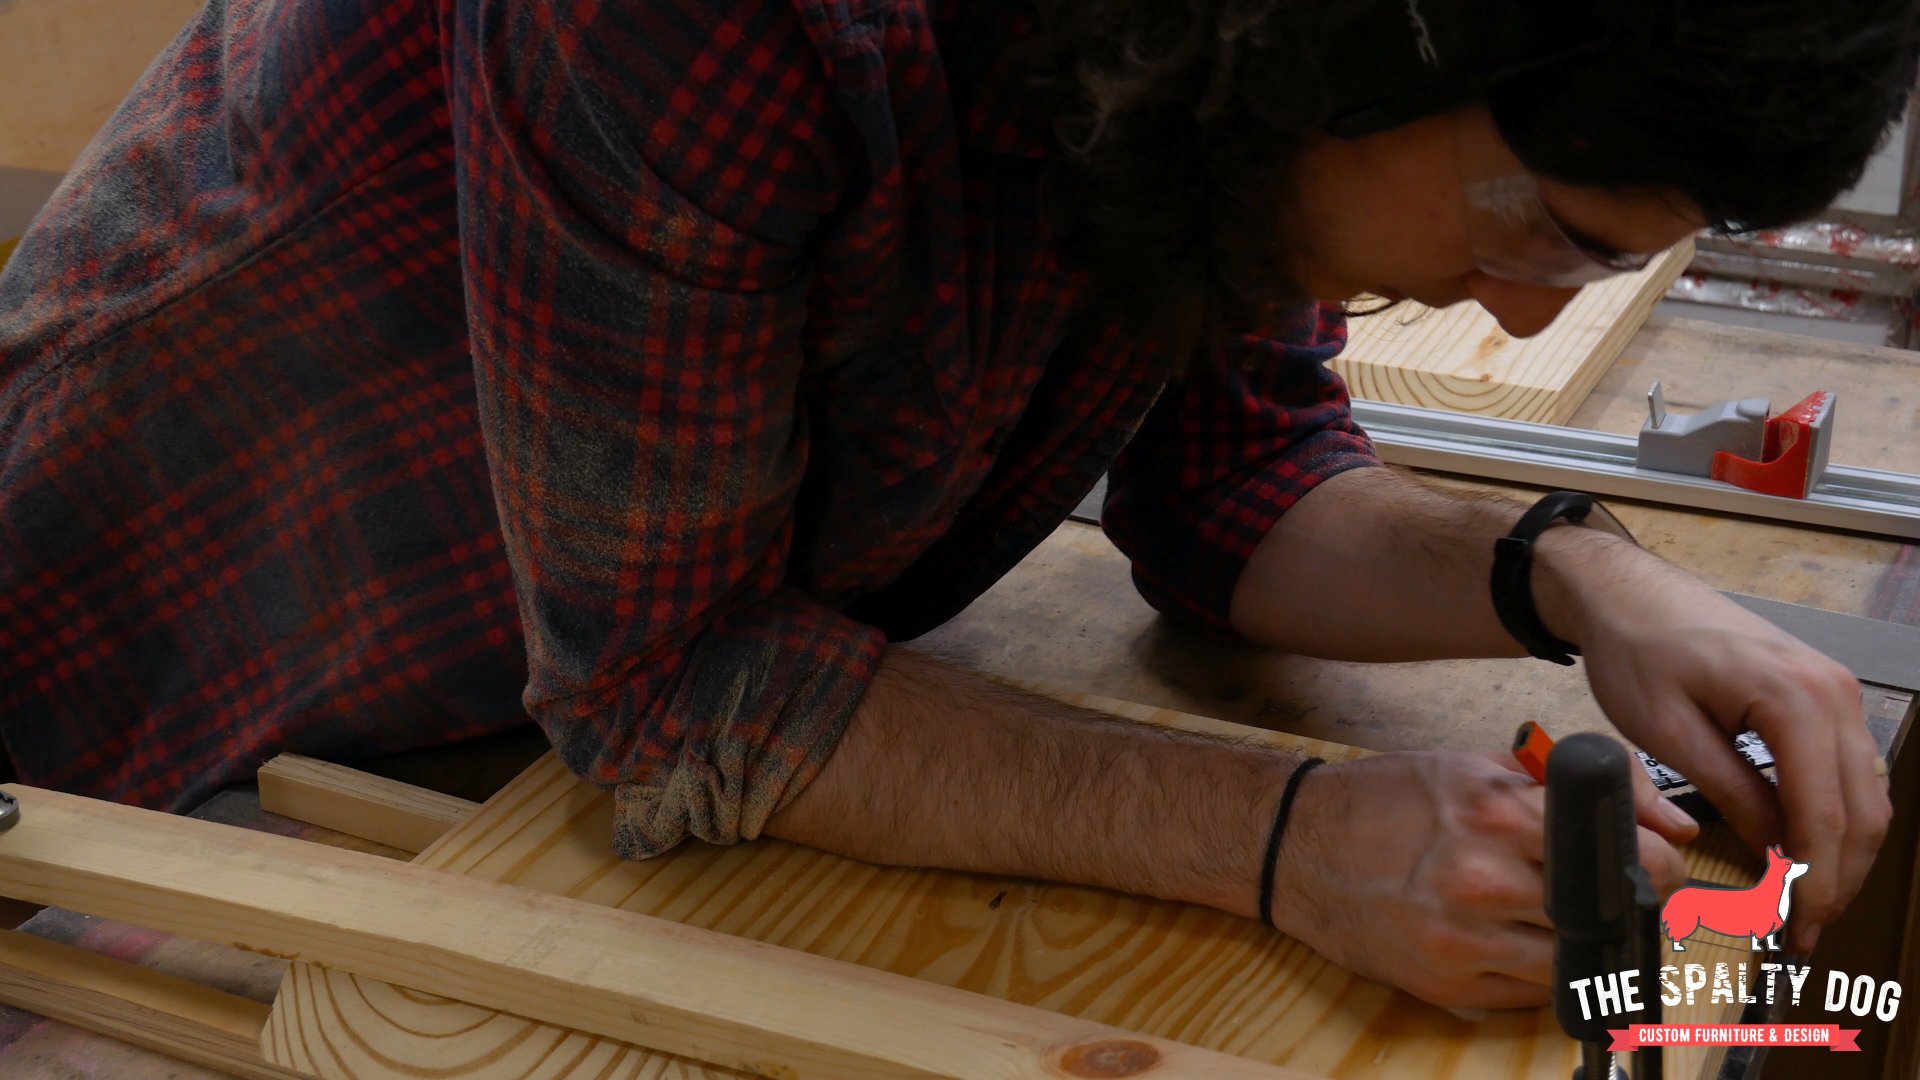
With the dados completed, I moved to marking the dowel locations for the top and bottom of the console. I marked a line one inch from each side using a speed square to show where I wanted the first and last dowel.

Now that I knew my start and end points, I used this spacing tool to help evenly space the other dowels from one another. You simply line up the first and last marker with your lines then twist the knobs to lock it in place. I then came back with my pencil to mark the other dowel locations.

Assemble the cabinet
At this point I was ready to start the dry assembly. You’re probably wondering what happened to my miters, so let me explain. The original plan was to use miter joints reinforced with dowels however, as I started the dry assembly I found my panels had cupped. This resulted in a huge gap in the center of each joint and was something I wasn’t going to be able to fix with clamps, so I decided to just move forward with normal butt joints. This is the first of many problems I’ll run into during this build which I’ll go into more at the end of this video.
Here I’m adding these right angle guides to hold the sides perpendicular to the top. This is really just temporary so I can sit the top on without having the sides fall over.

With the top in place I attached some additional right angle guides to make sure the top is perpendicular with the sides. I wanted to make sure the sides were flush with the ends of the top so I had used some scrap material and applied a great amount of clamping pressure to help prevent movement.

Again, as I mentioned these panels had some cup to them, so to correct this I used a few pipe clamps and some scrap resting over the cup. When applying pressure this would pull the center of the panels in flush while the right angle guides would keep the ends in place.

With everything aligned, I punched and drilled holes in each dowel location. However, at this point I only drilled the holes to fit a screw as the dowels will be added later on.

After repeating these steps for the bottom, clamps were removed to apply glue to the joints then were re-added to hold everything while it dries.

Additionally, decking screws were attached temporarily to help reinforce the joint.

Cut the shelf
While the cabinet was drying, I moved over to cutting the shelf to length at the miter saw. At full capacity, I lift the shelf slightly to cut a little bit further, but in this case the shelf is still too large so I had to flip it and take a second pass. Note, if you’re not comfortable with this that’s perfectly fine, you can trim any left over pieces with a hand saw.

With the shelf cut to length I marked out the corners I needed to remove since it will be in a stopped dado. To remove these pieces I simply used my Japanese pull saw while staying away from the line which was then finessed with a chisel.

Fit the shelf and dividers
I applied glue to the dados as well as the shelf ends. I then used a mallet and a scrap 2x4 to put it in place. This was a pretty tight fit and looking back now, I could have made it a little more loose and saved myself a lot of pounding.

With the shelf in place and the glue dried I then slide in the dividers. These are just held in place with glue and are kept aligned using a couple right angle guides. This is another point where the cupped panels caused some issues and the shelf didn’t want to fully contact the dividers.

Fill the knots
With this being all construction lumber, there were a few pretty big knots on some of the boards. To help stabilize this, I filled each knot with epoxy and left it for 24 hours to cure.

Cut the base
I set the cabinet aside and start working on the base. First step - cutting and threading all the pipe to length using an angle grinder, cutoff wheel and pipe threader. As a reminder, some big box stores will cut and thread pipe for you at no additional charge and this can save a ton of time. However, I’ve found there are some things that will always need finessed during assembly, one of which is how far the pipe threads into the fittings. It can be difficult to get each pipe to thread into each fitting at the same amount, and depending on your design these variances can compound quite a bit. So when cutting my pieces, I kept the dimensions from my plan in mind but also regularly checked against the actual build and make adjustments where necessary. I felt this offered a little more flexibility if you needed to slightly change your dimensions at any point. Another alternative to this would be building your base first and sizing your cabinet relative to your base.

Assemble the base
After all the pipe was cut I started assembling each leg for the base. I tightened everything by hand, then went back with pipe wrenches to finish it off. Once two of the legs were assembled, they were then joined with a connecting pipe. With the shape of these legs, it’s easy to tighten their connection by holding one in place while twisting the other.

After getting all of the legs assembled they were joined one more time with two pipes that extend the length of the console. Similar to my industrial desk build, I threaded the pipe all the way into one end then placed the other leg in position and loosened the connecting pipe. This causes the pipe to remove partially from one fitting and into the other.

Finish the base
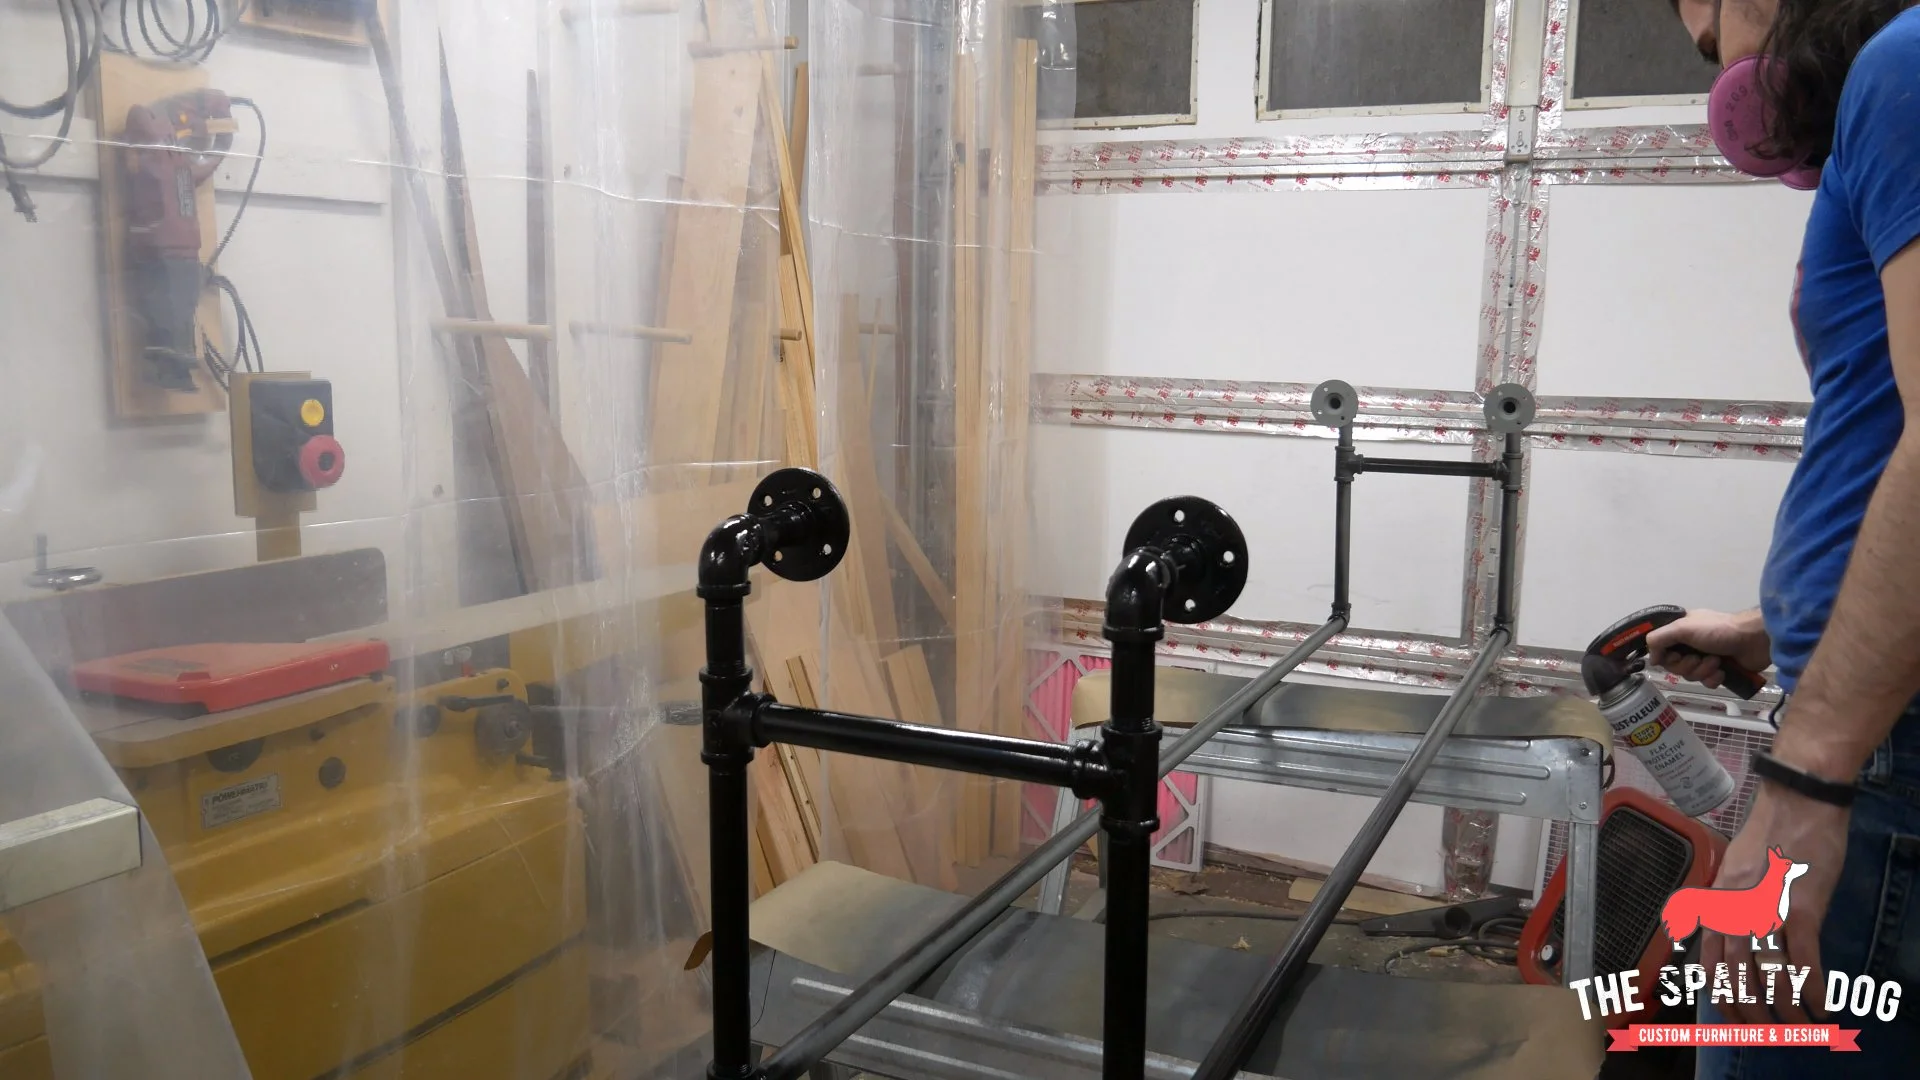
Next I cleaned the pipe from all oil and residue to prep for paint.

With a clean base, I first applied a few light coats of a self etching primer, followed up with a few coats of a flat black enamel and then finally finished off with a satin clear.
Final touches
While the base dried I jumped back over to sand the cabinet up to 220 grit.

Next I removed all the screws from the cabinet and drilled out larger holes for the dowels.

I then mixed up a 5 minute epoxy to secure the dowels.

I didn’t want to use regular wood dowels for this and thought why not use steel? So I took some left over 3/8” round rod from my plywood coffee table build and used that instead.

After applying the epoxy to the bottom half of each dowel I pounded each piece in with a mallet, making sure to go back and remove any excess epoxy.

Once the epoxy had set, I came back with my angle grinder and a flap disk to grind the dowels flush with the cabinet. I then sanded the whole piece again at 320 grit.

With the cabinet sanded I grabbed my plunge router and added a chamfer to all the edges.

Finish the cabinet
With the assembly and sanding complete, I was ready to start finishing. Since this is pine, I applied a pre-stain conditioner to help the stain take evenly to the wood.

After allowing the pre-stain conditioner to dry. I applied a dark walnut stain to the cabinet and wiped off any excess after 15 minutes.

I let the stain dry overnight, then came back and applied 3 coats of a wipe on poly while wet sanding with 1000 grit between each coat.

Final Assembly
With both the cabinet and base finished all that was left to do was connect them. To do this I placed 2 scrap 2x4s on the bottom of the cabinet to act as spacers for the base. It was at this moment I realized I made an error somewhere and my base was too tall. So off camera, after a pretty intense meltdown, I cut the legs, threaded the ends, assembled and painted the base again - which added about an extra day to the project.

After correcting the base I lined it up with the cabinet using a square, then pre-drilled my holes using a self-centering bit.

To attach the screws I used a flexible driver attachment which makes it much easier to work in tight areas that your drill or driver may not fit.

COMPLETE!
Here it is, a DIY industrial media console that you can build using basic materials from your local home center.

Thanks for following me along on this build! If you liked what you saw, feel free to follow me on my social channels and subscribe to my newsletter to receive the latest updates of what’s going on with The Spalty Dog.